Creating a new product
- Go to Products under Online shop in the menu and click Add product.
- If the What do you sell? choice appears, keep Product.
- Enter the product name (more than 3 characters), Price (₮) and Main photo. You can add photos later.
- Click Create and the product is created as a draft, with its edit page open.
The edit page has Main, Variants, Photos and E-barimt settings tabs. On the Main tab, fill in the category, brand, description, sale and tags, then click Save. Use Preview to see how the draft product will look in your shop.
- Write tags separated by commas (up to 20). They appear in your shop's filters.
- Filter the product list by All, Draft and Active, and search by name.
- The star button on a row makes a product Featured. Order featured products in the Featured products block under Website → Theme → Customize.
- A product removed with Delete cannot be restored.
Completeness and publishing
On the right of the edit page, a checklist shows the product's completeness as a percentage. Publishing needs 90%, which means all six items below must be met.
- Name (3+ characters)
- Price
- Photo (1+)
- Description (50+ characters)
- Category
- Variant and price structure: every active variant has a price
3+ photos and Tax settings earn extra points but do not block publishing. Click a row in the checklist to open that tab.
- Once everything is met, turn on the Publish to shop toggle on the Main tab.
- Click Save.
- Or turn on the toggle on the product's row in the product list and click Publish in the confirmation.
If you save while something is missing, it names what is missing. Turn the toggle off and the product goes back to draft and is hidden from your shop.
Adding and cropping photos
Add up to 8 photos on the Photos tab. The first photo is the main one. You can drag photos in.
- Adding a photo opens the Crop photo window. Choose the ratio: 1:1, 4:5, 3:4 or Original.
- Drag to position the photo and zoom in. Rotate it with the 90° button. On a phone, zoom with two fingers.
- Click Save. To upload without cropping, click Skip; to upload many photos uncropped, click Keep all original.
The buttons on an added photo let you crop it again, make it the main photo, move it left or right, or remove it. Save changes on the Photos tab with the Save button.
Variants and stock
Use the Variants tab for products that come in different colours or sizes.
- On the Variants tab, click a ready-made option: Size, Colour, Shoe size or Capacity, or use + Add your own to write an option name and its values.
- Edit the values as you like. A row is created in the table for every combination automatically.
- Set each row's photo, Price and Stock. To set one value for all, write it under Bulk edit and click Apply.
Variant changes are saved automatically. Turn a variant off with its row toggle and it is hidden from your shop. For a product with variants, prices are set per variant.
- For a product without variants, write the stock in the Stock (quantity) field on the Main tab.
- If stock is empty, it is not tracked and the product sells without limit. At 0, the product shows as sold out.
- Stock is reduced automatically when an order is paid.
- You can write your own reference in the Internal code field (optional).
Sales, pre-orders and cargo
- In the Sale section of the Main tab, choose By percent (%) or By amount (₮).
- Write the percentage (up to 90) or the amount to take off the price. The amount must be less than the product price. The sale price shows right below.
- Set an End date if you want one and click Save. Without a date, the sale runs with no end.
A sale starts as soon as you save it and ends automatically on its end date. There is nothing else to publish.
Turn on Pre-order and buyers can order and pay even when stock is 0. Write the arrival time in the When it arrives field (up to 120 characters) and it shows on the product card and page.
Cargo fee (₮) is the product's shipping charge. It is added to the order per item. At 0 nothing is added.
A sale for each variant
For a product with variants, each variant can have its own sale. For example, 30% off the large size and the product's 10% sale on the rest.
- In the Sale column of the table on the Variants tab, choose By percent or By amount.
- Write the percentage (up to 90) or the amount to take off; it saves automatically when you leave the cell. The amount must be less than that variant's price.
- Leave the cell empty and the variant follows the product's sale. Write 0 and that variant is not discounted.
- To set one sale for all, write it in the All variants sale field under Bulk edit and click Apply. Apply it empty and all variants follow the product's sale.
- The end date is the product sale's date on the Main tab. Variant sales end on that date too.
- Next to each row, the badge the shop will show appears. If it says Hidden, the 30-day rule hides the struck-through price and badge, but the variant still sells at its sale price.
- When variants have different sales, the product card shows the largest one as up to, for example Up to -30%.
- The header of the sale products list shows the largest honest discount, for example Up to 30% off.
Sale badges and savings
In the Sale badge section of the Shop policies page, choose how badges are written across every theme of your shop.
- With a minus sign: -20%, -10,000₮
- With OFF: 20% OFF, 10,000₮ OFF
- With the Mongolian word for cheaper after the amount
Turn on Show the savings amount and the product page shows a line such as You save 10,000₮. It only appears while the sale badge is showing. Make your choice and click Save.
Categories and brands
Categories, Brands, Bundles and Reviews sit in the first menu section that has products (usually Online shop).
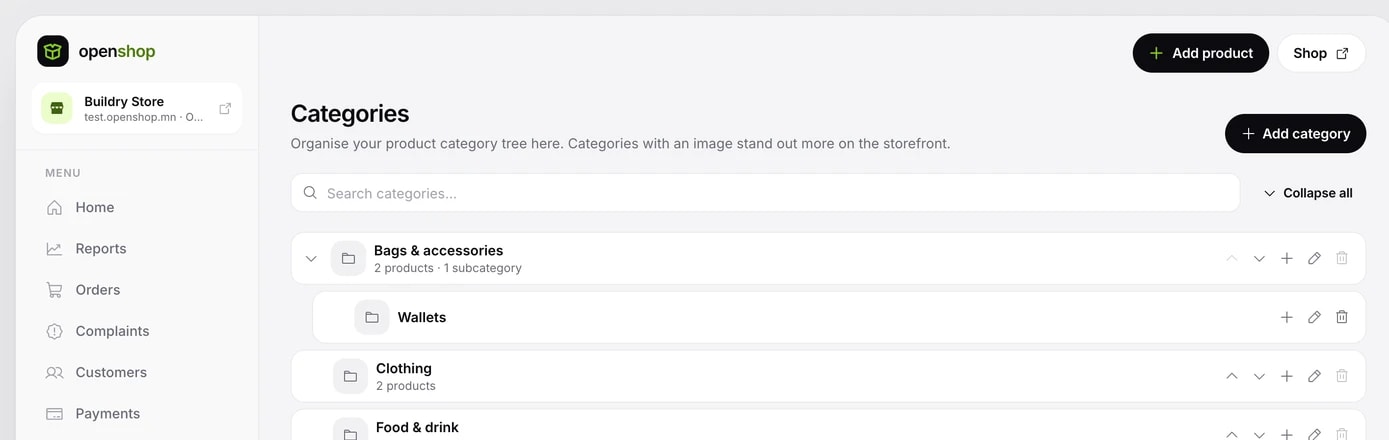
- Go to Categories and click Add category.
- Enter a name and, if you like, a photo. Use Choose under Standard category to link the matching Google and Facebook catalog category. If the name matches exactly, the system links it for you.
- Click Add. To add a subcategory, click the + button on the category's row.
Change the order with the Up and Down buttons. A category that has products cannot be deleted; move its products to another category first. Deleting a category also deletes its subcategories.
- Go to Brands and click + New brand.
- Enter the Logo, Name and, if you like, the Country of origin, Location and Description, then click Add. If URL name is empty, it is made from the name in Latin letters.
- Choose the brand in the Brand field on the product's Main tab.
Once a product with a brand is published, your shop shows a brands page, a page for each brand and a brand line on the product page. A brand with no published products is hidden. Deleting a brand keeps its products.
Bundles
Offer several products together at one lower price. With the Buy bundle button, the buyer puts them all in the cart at once.
- Go to Bundles and click + New bundle.
- Enter the Name, Description and Photo.
- Choose products with + Add product under Bundle products. For a product with variants, choose which variant to include.
- Write the Bundle price (₮). The regular total and the saving show below it.
- Turn on Active and click Save.
A bundle has 1 to 20 products. The bundle price cannot be more than the total of its products. Deleting a bundle leaves the products untouched.
Inventory
Inventory keeps stock per branch and warehouse and records stock in, stock out, counts and transfers. A small shop with one location does not need it; shops that do turn it on themselves.
- In Settings, Activities, turn on Inventory and confirm. The current count of every product you track stock for is recorded at the default location.
- Inventory appears in the Catalog section of the menu, under Products. In the Locations tab, click Add warehouse or Link a branch to set up your locations.
- In the Stock tab, click Stock in (goods received), Stock out (damaged, lost) or Count (the real counted number), enter the location, products and quantities, and click Record.
- To move stock between locations, click New transfer. Stock does not move until it is confirmed. When the goods arrive, open the transfer and click Confirm, or Cancel transfer.
- A product's stock is the sum of all locations, so the stock in your shop and in the app always matches.
- An online sale is deducted first from the order's pickup branch, otherwise from the default location.
- The Movements tab keeps every stock in, stock out, transfer and sale in order. History cannot be edited or deleted; if something is wrong, record a new correction.
- Set a Low-stock level for a product and you get a warning when its stock reaches it.
- Turning it on or off is for people who can edit settings; recording is for the owner, admins or staff the owner has allowed.
Importing products (CSV, links)
Bring in many products at once from a CSV file or from another site's links. Every imported product arrives as a draft, so you check and publish it yourself.
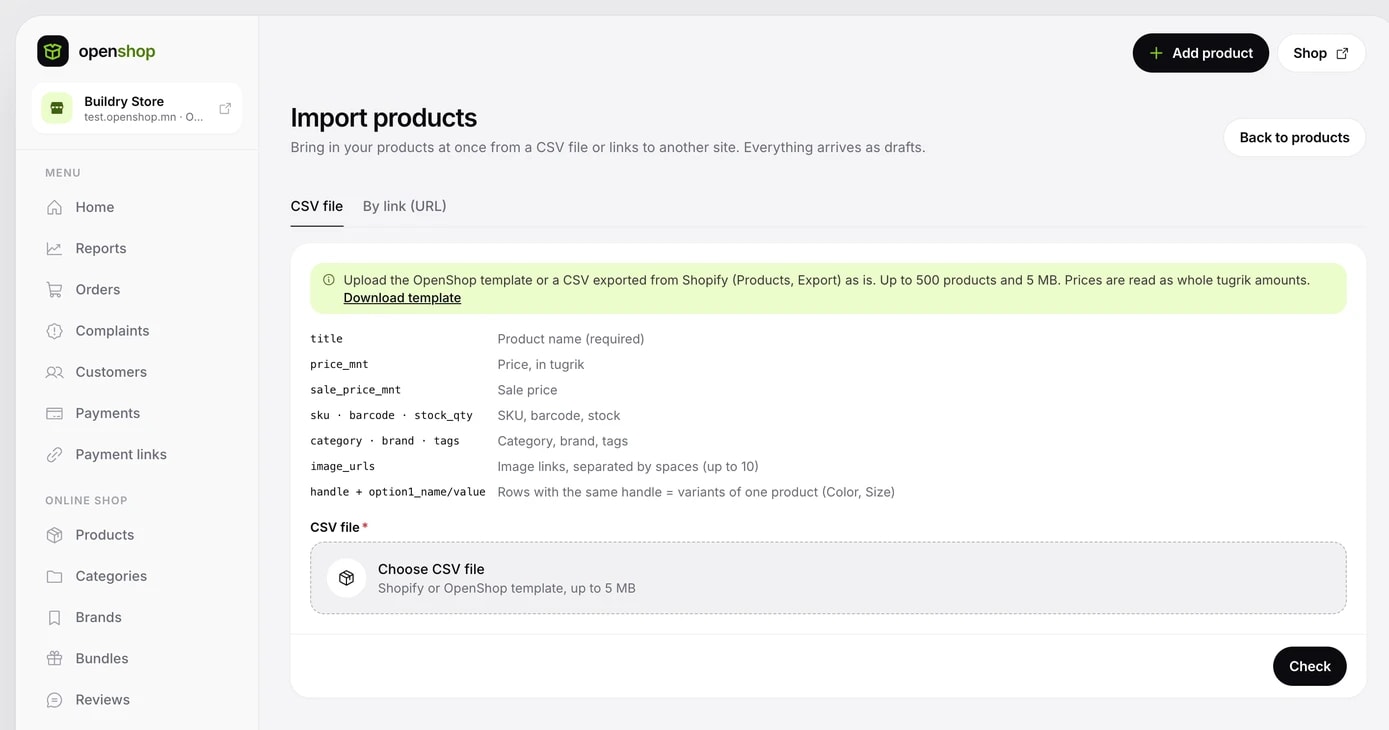
- On the Products page under Online shop, click Import.
- On the CSV file tab, choose a file in the OpenShop template (Download template) or a CSV exported from Shopify. Or, on the By link (URL) tab, write one product page link per line.
- Click Check. You see the result for each row without anything being written to your catalog.
- To create categories your shop does not have, tick Create missing categories. Otherwise those products come in without a category.
- Click Import N products as drafts, then Import.
- When it finishes, click View draft products, check them and publish.
- CSV: up to 500 products and 5 MB. Prices are read in tugrik, as whole numbers.
- Links: up to 20 at a time. Enter a Shopify shop's home page address on its own and up to 500 products are read.
- Up to 10 photo links per product. Rows with the same handle become variants of one product.
- Prices in currencies other than tugrik are left empty. Rows with errors are skipped.
You can close the page while an import runs; it carries on in the background. Downloading photos can take a few minutes. Click Stop and it finishes the product in progress and stops; the draft products already added stay. To bring in the rest, start a new import.
Reviews and ratings
Someone who bought from your shop and paid leaves one review for each product in the order: 1 to 5 stars, text and up to 4 photos.
- Go to Reviews. Filter and search by status, stars and text.
- Write your shop's reply with Reply and click Publish. The reply is visible to everyone on the product page.
- Hide abusive, spam or personal-data reviews with Hide. A reason is required; the note is visible only to you.
- Restore a hidden review with Publish again.
A hidden review's text and photos are hidden from the public, but its star rating still counts in the average. Buyers can mark reviews as Helpful, and the console shows the count as helpful to N people. The shop itself cannot mark them.
A product's e-barimt settings
In a shop with e-barimt turned on, the product's E-barimt settings tab opens. Empty fields inherit the shop's main settings (Settings, E-barimt tab).
- Barcode: the striped code on the product. Type it and leave the field, and the classification, unit of measure and tax type are filled in from the national database. Values you filled in are not overwritten.
- Classification code: choose the category step by step.
- Unit of measure: if empty, pcs (pieces).
- VAT type: Standard, VAT-exempt or 0%. For exempt or 0%, choose the legal exemption code. If you are unsure whether the law exempts the product, keep Standard (training is exempt only for licensed organisations).
- Shops that are not VAT payers also choose Standard. The receipt shows VAT as 0.
- Capital city development tax (2%): turn it on for hotels, restaurants and the like.
Filling in a barcode or classification code adds an extra +5 points to completeness. Save with the Save button.