The order list and filters
Every order appears in the Orders section of the console's left menu, newest first. The top right corner offers the Table, Kanban, Calendar and Unpaid views.
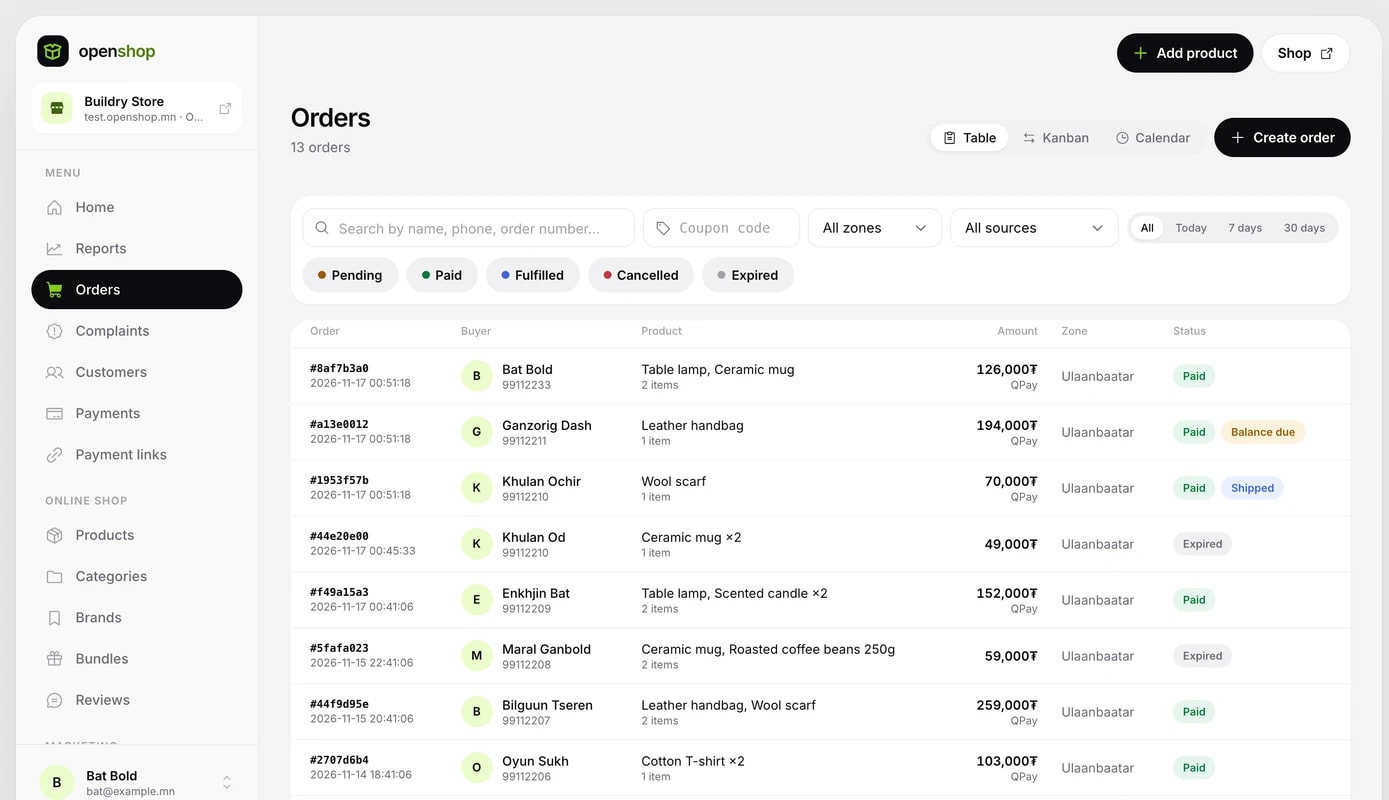
- Table: one row per order with the order number, date, buyer, products, total, region and status.
- Kanban: orders sit in the step they have reached from sale to delivery: Awaiting payment, To ship, Shipped, Delivered and Closed, with each column's count and total.
- Calendar: each day's sales and the number of paid, shipped and delivered orders. Click a day to see that day's orders.
- Type a name, phone number or order number in the search field.
- If needed, choose the region (Ulaanbaatar, Countryside), source (OpenShop, Facebook, Instagram, Direct / unknown) and period (Today, 7 days, 30 days).
- Type a code in the Coupon code field to filter orders that used it. The code shows below the total of an order with a coupon.
- Click one status chip on the bottom row to keep only orders in that status. Click it again to clear the filter.
- The list loads 200 at a time. To see older orders, click Load earlier orders at the bottom.
Statuses: Pending (awaiting payment), Paid, Fulfilled, Cancelled and Expired. When an order partly paid by gift card has a balance that was not covered, it shows as Underpaid.
- Clock badge: the order's time has passed, but the buyer can still confirm the payment in their payment app.
- Paid after expiry: an order cancelled on expiry was paid later and came back as Paid. If the stock is not enough, a separate warning shows and you decide what to do with that order.
- Receipt badge: shows whether an e-barimt was issued or there was a problem issuing it.
Order details
Click a row in the list and the Order details panel opens on the right.
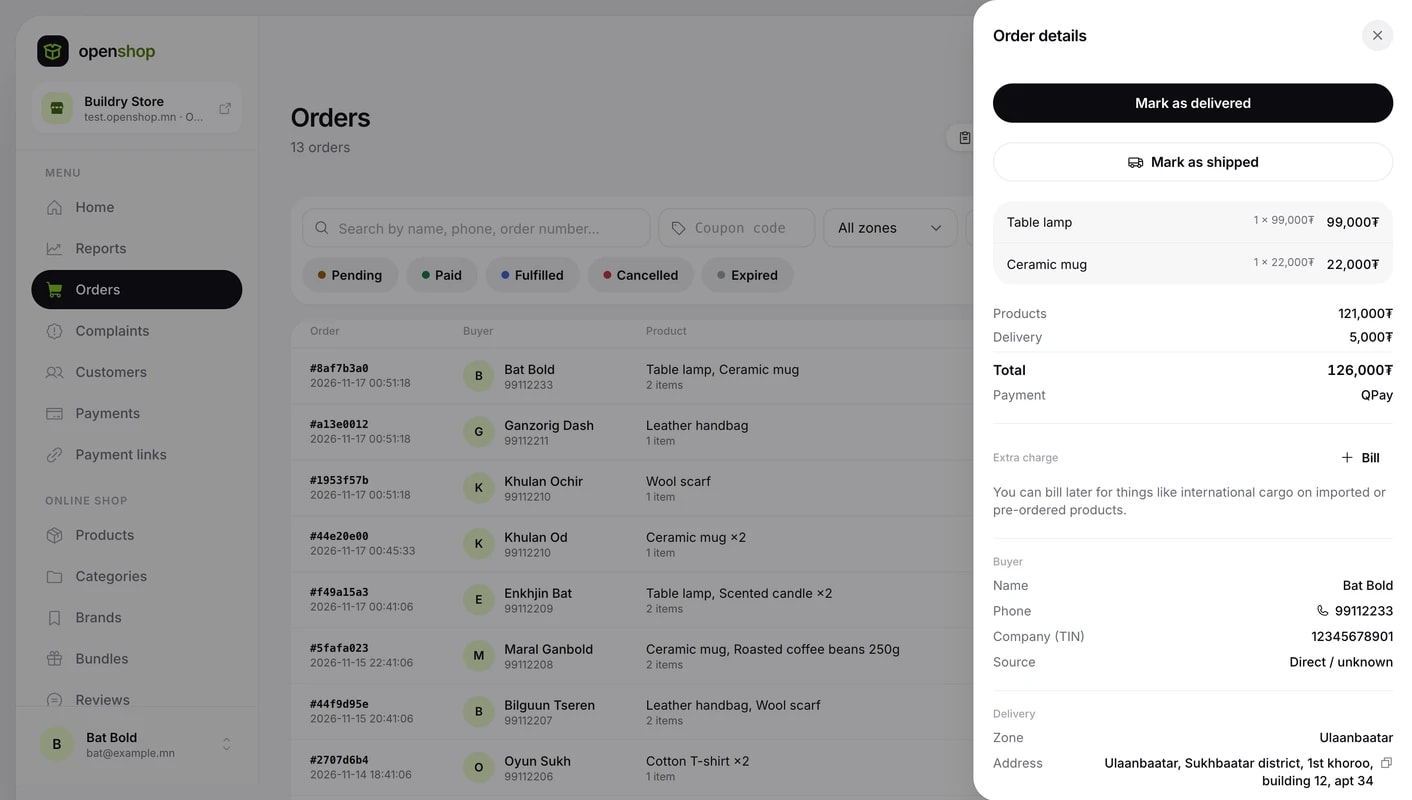
- Each product with its chosen variant (size, colour), quantity and price.
- Products total, discount, delivery, cargo and grand total. The part paid by gift card has its own line.
- If a coupon was used, the coupon code, its terms (for example 10% off) and the amount taken off this order have their own line.
- Buyer: name, phone (tap to call), company TIN or registration number, and source.
- Buyer's note: anything written on the order, such as a gift message.
- Delivery: region and address. Click the address to copy it. Pickup orders show the branch name and address.
- Orders with digital products or courses get a Digital delivery section where you can resend the download link.
- If an e-barimt was issued, its receipt number and issue date.
Creating an order by hand
Create an order you took by phone or Messenger in the console and send the buyer the payment link. The order is created as Pending and becomes Paid only after the buyer pays through the link.
- Click Create order at the top of the Orders page.
- In Products, search by product name, pick from your published products and set the quantity.
- Enter the buyer's name and 8-digit phone number. Email is optional and becomes the delivery address for digital products.
- Choose the delivery method: a zone and delivery address, or a Pickup branch.
- Add a Note if needed. It shows in the order details.
- Check the Amount due, click Create order and confirm.
- Send the payment link to the buyer with the Share button.
- Prices, sales, promotions and delivery fees follow your shop's rules, exactly as for an order placed in the shop.
- Once paid, stock is deducted and the e-barimt is issued as usual.
- The source of such orders shows as Created manually.
- To copy the link again, open the order details. The link expires; the expiry time is shown when the order is created.
The kanban board
The Kanban view shows orders by delivery step. Awaiting payment holds orders not paid yet, To ship holds paid orders not sent yet (pickup orders wait here too), Shipped holds orders on the way and Delivered holds orders handed over. Cancelled and expired orders are folded into the Closed column; click its arrow to open it.
- Drag an order card from To ship onto Shipped. A form for the courier and tracking number opens; saving it sends the buyer one email.
- Drag a card from Shipped or To ship onto Delivered and confirm with Delivered.
- Instead of dragging, click the arrow in the card's top right corner and choose where it goes. This also works with a keyboard or screen reader.
- Marked Delivered by mistake? Use that card's arrow to move it back.
- Each column scrolls on its own. The next orders load as you scroll down, or click Load more.
- A column head shows the column's total number of orders; its sum is shown only to people who can see reports.
- Unpaid orders cannot be moved on the board: once paid they move to To ship by themselves.
- Search, region, source and period filters apply to the board too.
Marking an order shipped
You deliver orders yourself or through a delivery company you choose. OpenShop does not deliver and has no connection to delivery companies. Marking an order shipped is a way to pass the parcel details to the buyer.
- Open the details of a Paid order and click Mark as shipped.
- Write the delivery company's name (required). Mongol Post, EMS, DHL and Delivered by the shop are suggested; you can write another name.
- Enter the tracking number if you have one. If the delivery company has a tracking page, enter its address starting with https:// in the Tracking link field. Both are optional.
- Click Save and choose Shipped in the confirmation.
The first time you mark it, the buyer gets one email with the delivery company and tracking number. The order status stays Paid, with a Shipped badge next to it.
You can also mark orders shipped and bill extra charges from the order details in the OpenShop Merchant iOS app (see the Mobile app guide).
Marking an order delivered
- Once the item reaches the buyer, click Mark as delivered in the details of the Paid order.
- Click Delivered in the confirmation. The order moves to Fulfilled, and the buyer sees that status.
Internal notes, bulk marking and packing slips
The History and internal notes section of the order details shows what happened to the order (created, paid, receipt, shipped, delivered) in time order.
- Internal notes: write in New note and click Add note. Notes are visible only to your shop's staff and never to the buyer. Only the person who wrote a note can delete it.
- Marking many orders delivered: in the table view, select rows (up to 100 at a time) and click Mark as delivered. Orders that are not Paid are skipped, and the confirmation says how many.
- Packing slips: select orders and click Print packing slips. Each order prints on its own page with products, variants, quantities, recipient, address and the buyer's note. Prices are not printed.
- Filters and CSV: filter by delivery progress, payment detail, source, period and sort order, then Download CSV for that list. Filters stay in the address bar, so you can send the link to your team.
- Unpaid tab: orders whose time ran out before payment, with the status of the reminder email. Contact details of people who opted out of reminders are hidden.
Billing an extra charge
International cargo for made-to-order and imported products is charged by weight after it arrives. In that case you bill an extra charge on the paid order and the buyer pays it by link. The order status does not change, and the money goes straight to your account.
- Open the details of a Paid or Fulfilled order and click Bill under Extra charge.
- Write the amount. Each charge can be up to 3 times the products total, and at most 10 million₮.
- Choose a reason: International cargo, Weight difference, Balance due or Extra charge. You can add a note the buyer will see (for example 2.4 kg × 15,000₮).
- Click Bill and confirm. Copy the link with the Copy button and send it by Messenger or SMS.
- If the order has an email address, the buyer automatically receives an email with the payment link.
- On the order lookup page, the buyer sees a Balance to pay line and a Pay button.
- In the list, orders with an unpaid extra charge show a Balance due badge. You get an email as soon as it is paid.
- Every paid extra charge gets its own e-barimt. The order's original e-barimt does not change.
- Only one unpaid extra charge at a time. Up to 3 in total per order, billed within 30 days of the order being paid.
Answering complaints
When a buyer reports a problem with an order (the item did not arrive, a different item arrived, it is damaged or incomplete, and so on), it comes into the Complaints section of the menu. Answer a new complaint within 48 hours. An unanswered complaint moves to OpenShop mediation and affects your shop's Verified shop badge.
- In Complaints, use the Open filter to see the complaints you have not answered. The Time column shows how many hours are left to answer.
- Click a complaint to read the reason, the buyer's request, the order, their explanation and the attached photos.
- Choose the type in the reply field: Resolved, Offer a solution, Do not accept or Add a note.
- Write your explanation and click Send.
- Add evidence such as a delivery receipt or chat screenshots under Attach photos (up to 5).
- Resolved: closes when the buyer confirms, or after 7 days.
- Offer a solution: closes if the buyer accepts; if they decline, it moves to OpenShop.
- Do not accept: explain why and attach your evidence.
- Add a note: the status does not change.
Customers
The Customers section lists every buyer, registered or ordering as a guest, in one list. Guest orders with the same last 8 digits of a phone number count as one person. Paid and Total spent are the product totals of paid and delivered orders, without delivery fees.
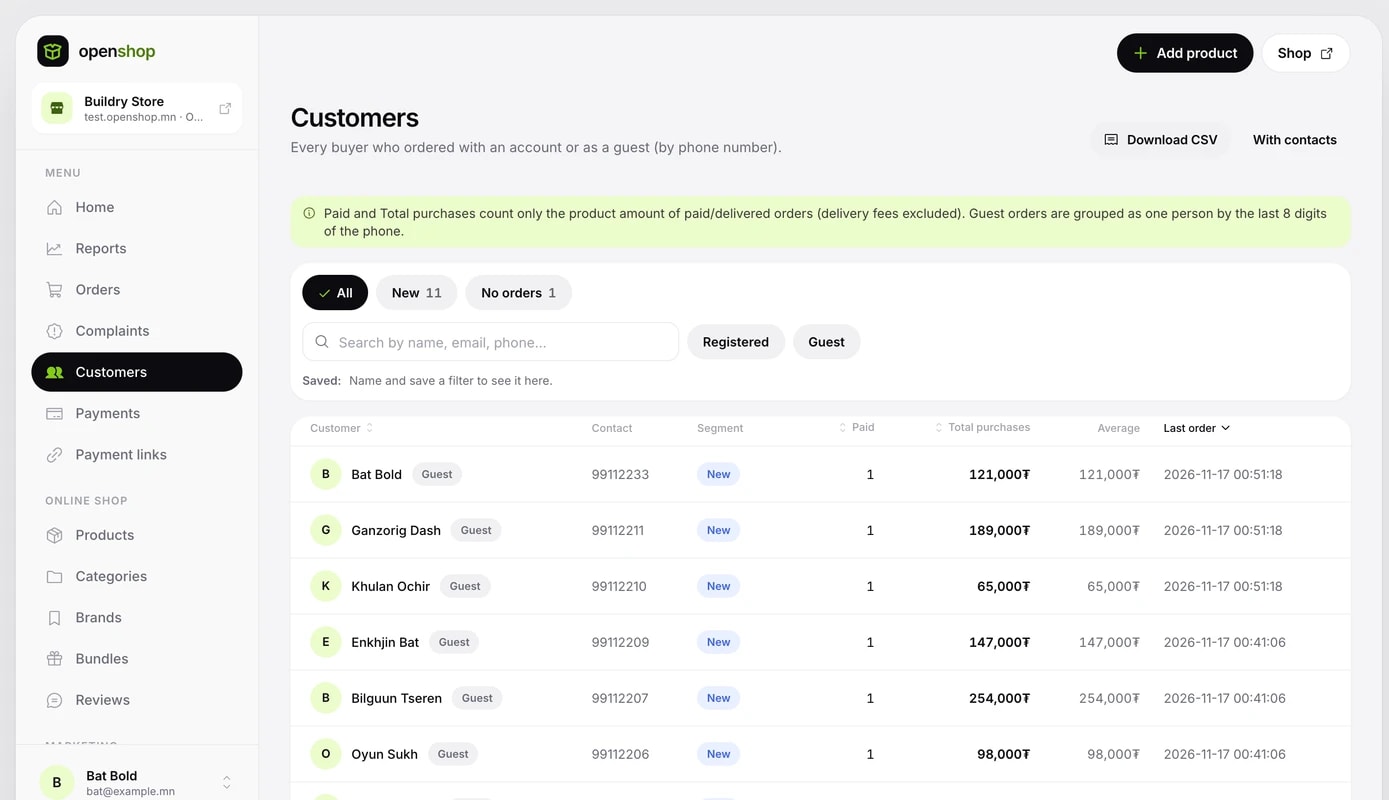
- Segments: Champions, Loyal, New, Might return, At risk, Lapsed and No orders. The system updates segments every night.
- Search and filters: search by name, email or phone; Registered or Guest, Open follow-up, Email consent, SMS consent, no order in a number of days.
- One search: type 2 or more characters in the search field and an Orders and customers panel finds orders and customers together by order number, the last digits of a phone, email, name, coupon code or the last 4 digits of a gift card.
- Saved filters: name and save the current filter to call it up with one click later.
- Download CSV: download the list as a file. The With contacts button downloads a file with name, phone and email; the download is logged.
Click a customer to open their card: paid orders, total spent, average order and last order. The History section shows orders, payments, shipping and delivery, bookings, coupons, gift cards, points, reviews, complaints, notes and follow-ups in one place, newest first. Scroll down to load older ones.
- Tags: add tags such as VIP or wholesale and filter the list by tag.
- Internal note: visible only to your team, never to the buyer. Do not write registration numbers, card numbers or health details.
- Linked accounts: Merge guest orders with the same phone into a registered customer, and Unlink them if needed.
- Points: with shop points turned on, see the balance and Adjust it by hand with a reason.
Follow-ups
Follow-ups help you remember to get back to a customer or do what you promised. They are visible to your shop's team only and are never sent to the buyer.
- Click Add follow-up on a customer's card or in the order details.
- Write the task in What to do (for example: Call on Friday). Add a Note if needed.
- Choose the Due time (Ulaanbaatar time) and the Assignee.
- Tick Email the assignee when it is due if you want a reminder, then save.
- The Follow-ups page under Sales sorts them into Mine, All, Unassigned and Done. The number of your overdue and today's follow-ups shows as a badge in the menu.
- The Board view shows Open, Snoozed and Done columns, and you can move the cards.
- Snooze: Tomorrow, In 3 days or In a week. The follow-up reopens at 09:00 on that day.
- Done, Reopen and delete each ask for confirmation.
- The reminder email goes only to the assignee's own address and contains neither the follow-up text nor the customer's details.
Reports and CSV
The Reports section has four tabs: Reports, Products, Calendar and Raw data.
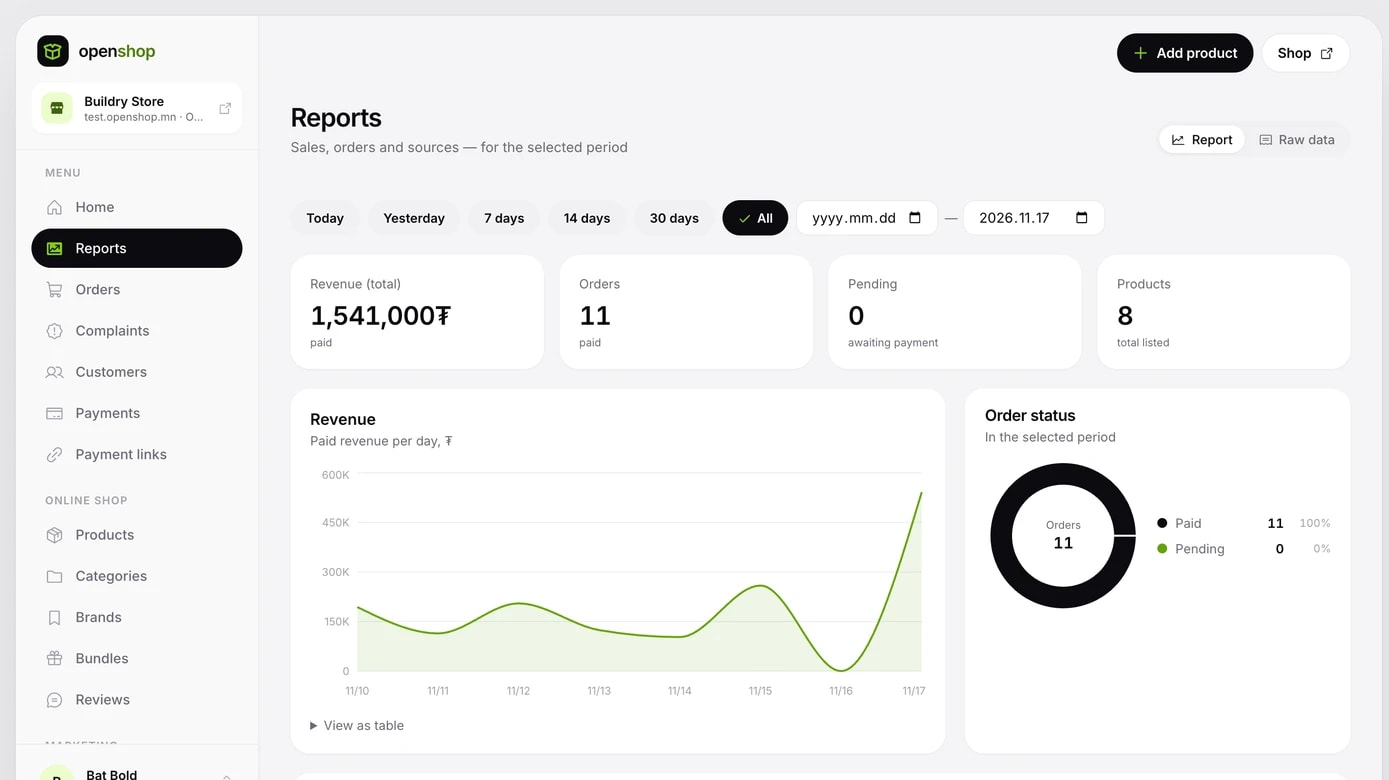
- Reports: for Today, Yesterday, 7 days, 14 days, 30 days, 90 days, All or dates you choose, you see revenue, order count, orders awaiting payment and a daily chart.
- Product sales: the best-selling products, quantity sold, revenue and stock.
- Where buyers came from: paid orders and revenue for each source.
- Variant sales: by size and colour.
- Visits and conversion: how many people visited your shop and how many bought, the count at each buying step, where visitors came from, and the most viewed pages and products.
- Calendar: by month or week, each day's sales total, paid orders and the number of orders shipped and delivered. Today is highlighted. Click a day to open that day's order list. On a phone the days show as a list.
The Products tab is the best-seller analysis. For each product you see units sold, net sales after discounts, orders, share, the change against the previous period of the same length and the daily trend.
- ABC classes: A = the core products bringing the first 80 percent of sales, B = the next 15 percent, C = the rest.
- Rising and falling products: the products whose units changed the most against the previous period.
- Stock cover: how many days the current stock lasts at this pace (for products with tracked stock).
- Conversion: how many of the visitors who viewed the product ordered it.
- Products without sales: active products with no sale in the period, the most viewed first.
- Open Reports → Products and choose the period.
- Sort (units, sales, growth, conversion) and filter by category or brand.
- Click a product row to see sales and stock per variant. Download CSV gives every product in a file.
- Open Reports → Raw data.
- Click Download Excel (CSV). The file contains orders from all time.
Payment links
Take payments that are not orders (deposits, repairs, course fees, donations) with a link. The payment goes straight to your account.
- In the Payment links section of the menu, click + New link.
- Type: choose Payment link or Donation.
- Write a Title (required) and a Description the payer will see.
- In the payment lines, write what the payment is for, the quantity and the unit price. Add more lines with + Add line. The e-barimt is itemised line by line.
- Choose the last day in the Due field. Leave it empty for no deadline.
- Click Create link. Copy it with Copy link and send it by Messenger, SMS or email.
- Donation: with Payer chooses the amount on, you only set a minimum. The Issue e-barimt switch starts off for donations; check with your tax adviser whether to turn it on.
- As soon as it is paid, the link's status becomes Paid and you get an email. If e-barimt is set up, the receipt is issued automatically.
- Filter the list by All, Pending, Paid and Cancelled, and download it as CSV.
- Click Cancel in the link's details and it can no longer be paid.